Getting Started
What's Included?
Basic Account
Play for free. Includes:
- An instant collection: Nearly 3,000 cards to brew with right away, including 5 ready-to-play decks
- Open play matches for most constructed formats, including multiplayer Commander!
- Super Jump! Draft Vintage half-decks for free (Phantom Event: Cards not added to Collection)
- Nearly 3,000 cards
Account Upgrade
$5 One-Time Purchase. Includes:
- Trade and chat with other players
- Direct buddy-challenge
- Prize-based event play, including events that lead to the Pro Tour and Worlds
- More cards! More than 9000 total with Starter Kit & Account Upgrade
- 1 each: Gauntlet and Commander Gauntlet Entry Tokens. Battle with preconstructed decks for prizes!
Start Playing Today
Download & Install Magic Online
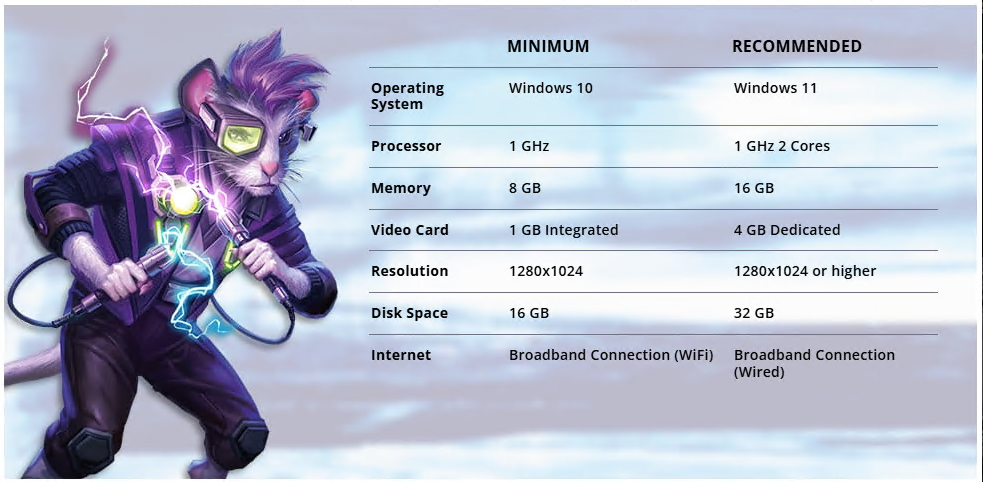
Double check that your PC meets the minimum requirements, then download the Magic Online installer above and follow the setup instructions.
Magic Online System Requirements:
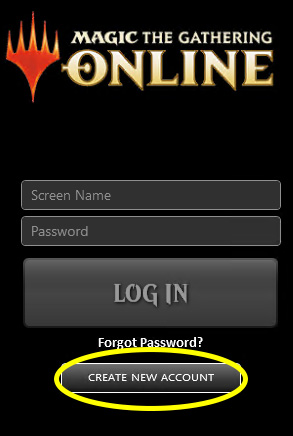
Create an Account
Once the game has installed and launched, click "Create New Account" and follow the steps to create and activate your account.
Account Upgrade (One-Time Purchase)
When you're ready to get the most out of your Magic Online experience, head to the STORE tab and upgrade to a full account for only $4.99.
Starter & Upgrade Kit Contents
Your free-to-download basic Magic Online account kit includes 5 ready-to-play decks and nearly 3000 cards. Upgrading to a full account ($5 USD in Store) unlocks Trade, Chat, Store access, and more cards, bringing the total to over 9000.
Interface Overview
Use the navigation bar to explore the client.
Home: View at-a-glance information including announcements, upcoming tournaments, your leagues, and buddies list.
Collection: Build decks, view your collection, and manage trade binders.
Constructed: This is where you'll play with cards that are in your collection. Leagues, tournaments, queues, and open play rooms for 1v1 and 3+ player Constructed formats. In Gauntlet events, preconstructed decks are provided for play,
Limited: Leagues, tournaments, and queues for sealed play. Open and draft packs to play formats like sealed, draft, Magic Online Vintage Cube, and Pack Wars.
Store: Purchase Event Tickets, draft bundles, Commander decks, boosters, and more.
Trade: Trade cards and other digital objects with other users.
What's Next?
With so much to do, Magic Online can feel overwhelming at first. Use this guide to get playing quickly and confidently, and if you run into issues along the way please reach out to our support team for assistance. If you'd like to meet and interact with other Magic Online community members, be sure to head to the Magic Online Forums as well as join the Magic Online Discord.